In this article, we will give you an overview of the calendar and all of the options that are available.
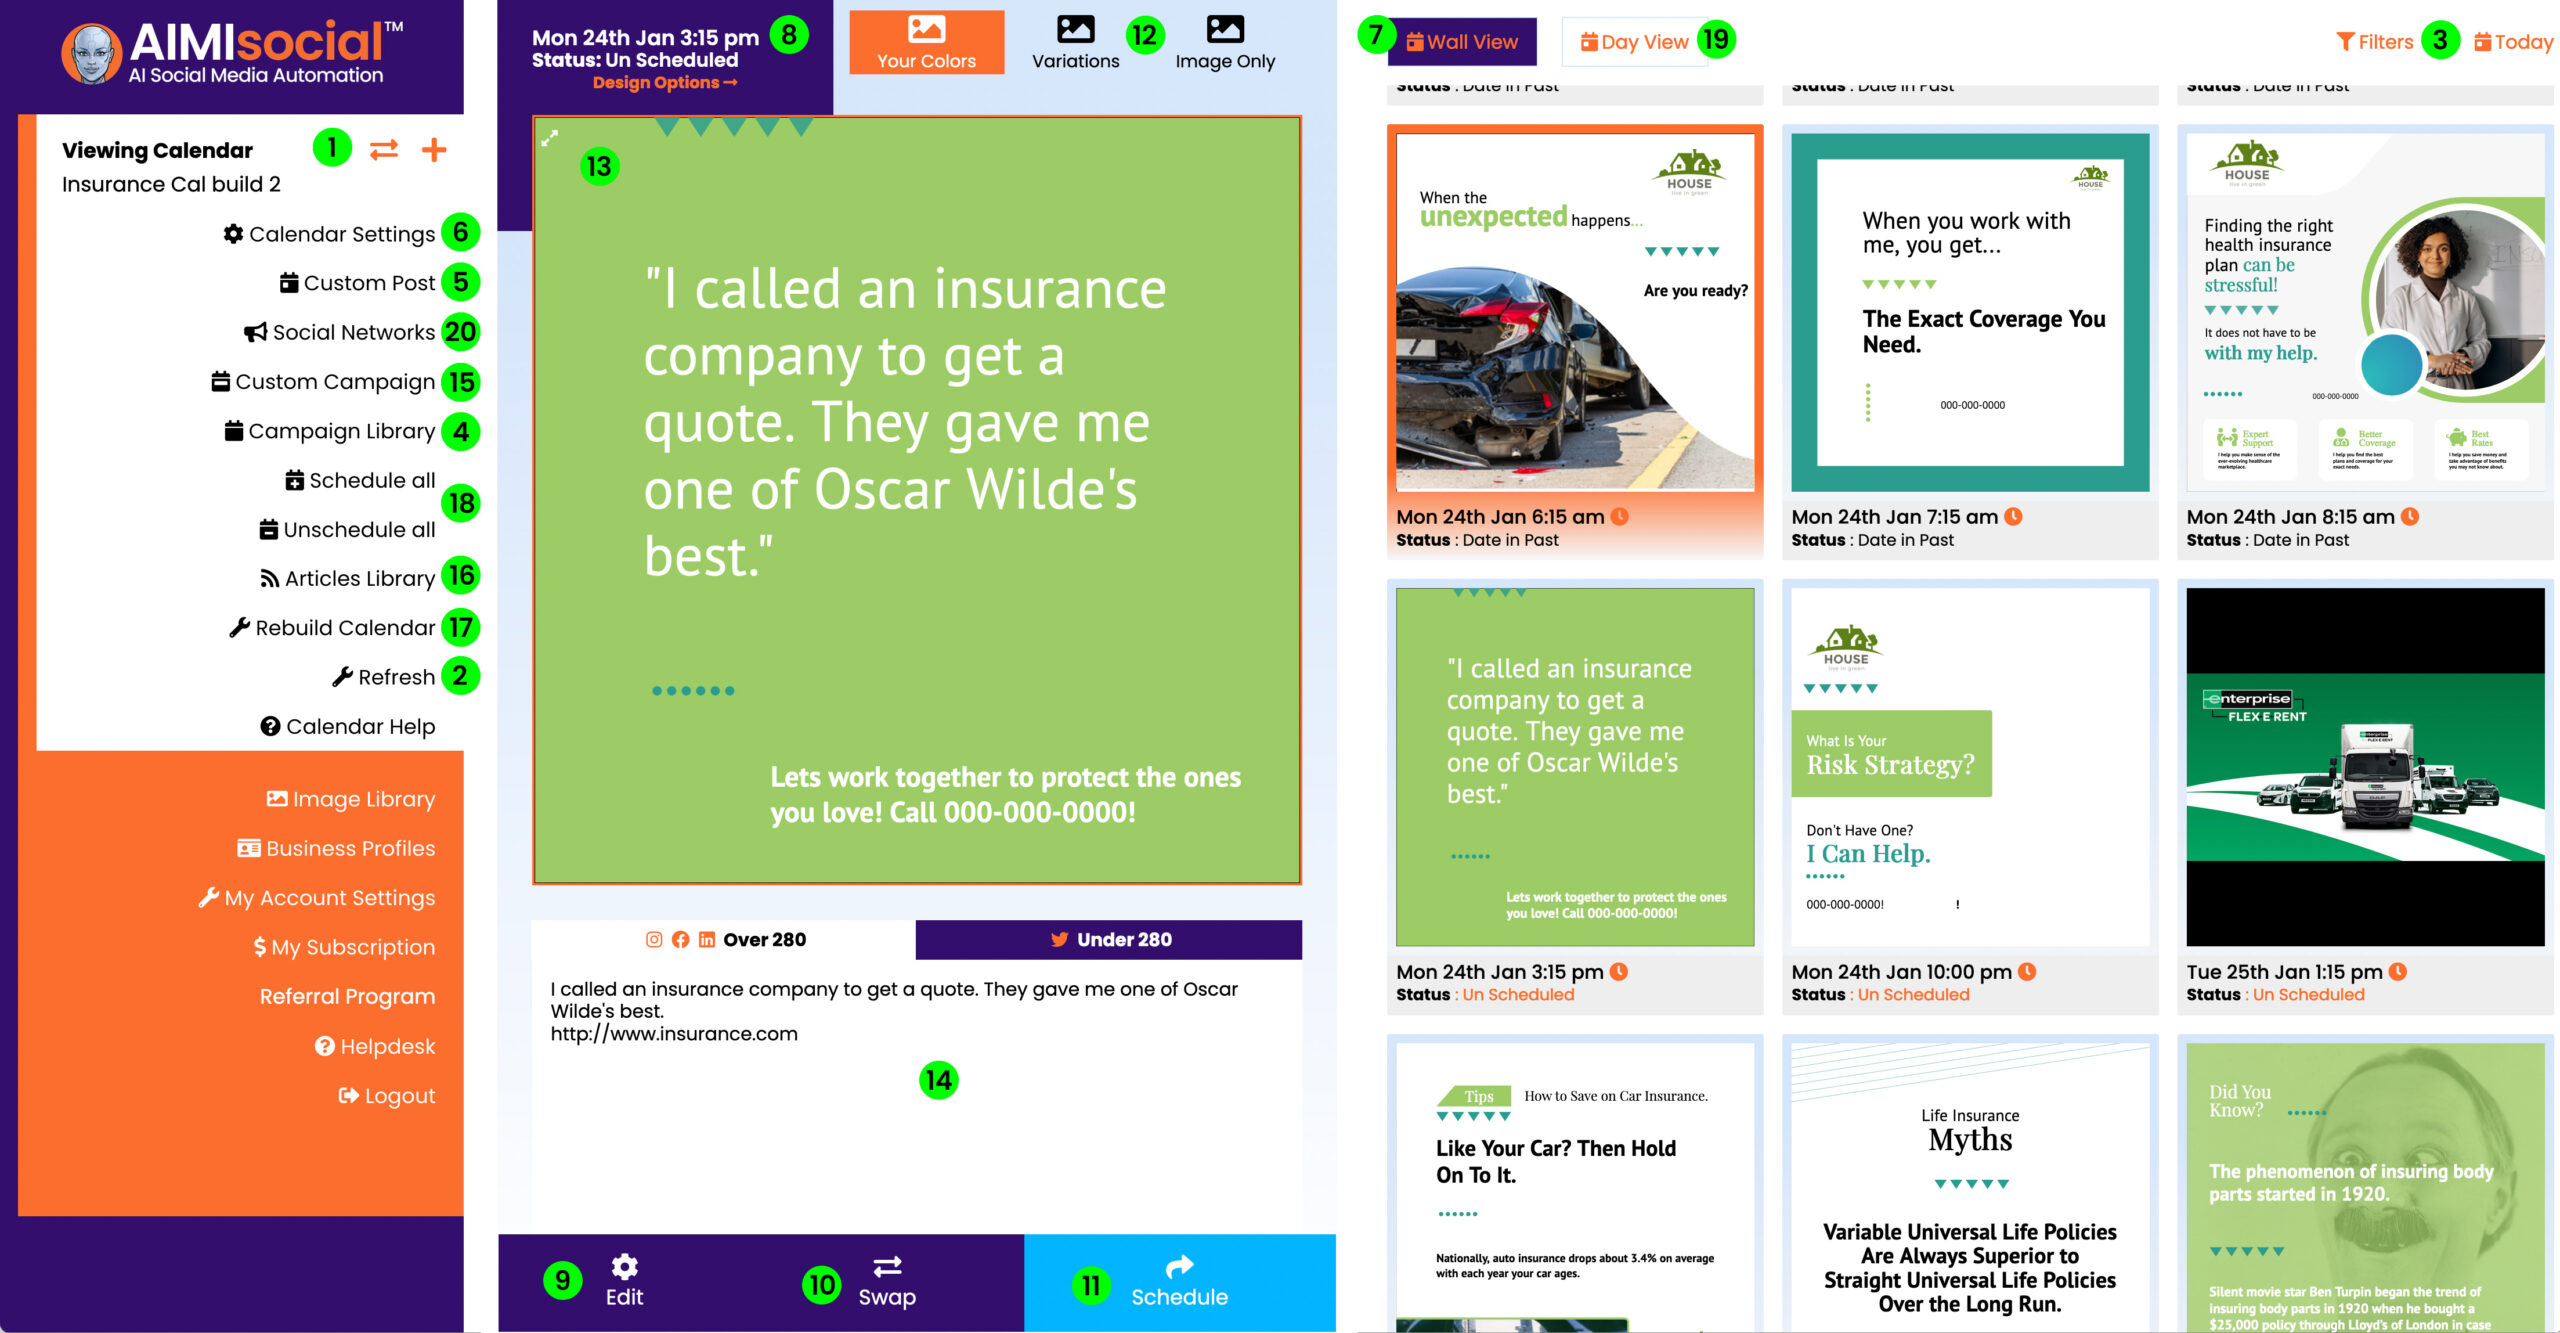
#1: Calendar List Menu
This menu is where you see the full list of all calendars you have created. It is also where you add and remove calendars from your account. Find training here: How To Add & Remove Calendars
#2: Calendar Refresh Button
When you click this button, we refresh your calendar data to show you the latest information on your posts. Find training here: How To Refresh Your Calendar Posts
#3: Calendar Filters
When clicked, this launches our filter options to sort your calendar by post status and day of the month. Find training here: How Calendar Filters Work
#4: Campaign Section
When clicked, this launches the campaign management section of the app.
#5: Custom Post
When clicked, this opens our editor that allows you to create a custom post.
#6: Calendar Settings
This section has all of your calendar and “post to” settings to specify which social networks you want the posts published to when scheduled. Find training here: Calendar Settings & Defaults
#7: Wall View
The “Wall View” option shows you all of your posts in order by date and time. When you login into the app, it will always start you on today’s date. You can scroll up and down to see all your posts. Click on a post to see the posts in your post area of your calendar.
#8: Post Information
In this area, you will see the post’s name, the date and time the post is scheduled for, and the current status. Find training here: Post History, Status, & Posting Errors Overview
#9: Edit Post
Click on this button if you want to make any edits to your post. Find training here: How to Edit A Post (Post Editor Overview)
#10: Swap Post
Click on this button if you want to swap out this post for another from AIMI’s post library. Find training here: How The Post Swap Feature Works
#11: Schedule Post
Click on this button to schedule or unschedule your post to be auto-published to your social networks. Find training here: How to Scheduled & Un Schedule posts
#12: Image Post Options
Click on either “Advanced” or “Basic” to see the designs AIMI created for you. Or you can select the “Image Only” to post with just an image and no design. Find training here: Image Options Overview
#13: Post Card
Use your finger or click on the arrow icons to swipe left or right to see your next or previous posts. Click on the image to enlarge it.
#14: Text Area
This is where you review the text AIMI wrote for you for that post. Click on the “under 280” tab to see the version of the text used for Twitter.
#15: Custom Campaign
When clicked, this opens our editor that allows you to create a custom campaign.
#16: Article Library
When clicked, this opens the article library management section associated with your calendar.
#17: Article Library
When clicked, this opens your calendar rebuild options.
#18: Schedule All or Unschedule All
When clicked, this will schedule all post or unschedule all posts.
#19: Day View
When you click this option the app shows you a week of posts at a time. It will always start you on today’s date. You can use the scroll bar or arrows to see all the post created for that day. Click on a day to see the posts schedule for that day.
#20: Social Networks
When clicked, this opens our social networks area where you manage which social profiles AIMI will post to when you schedule your posts.
In this article, we will give you an overview of the calendar and all of the options that are available.
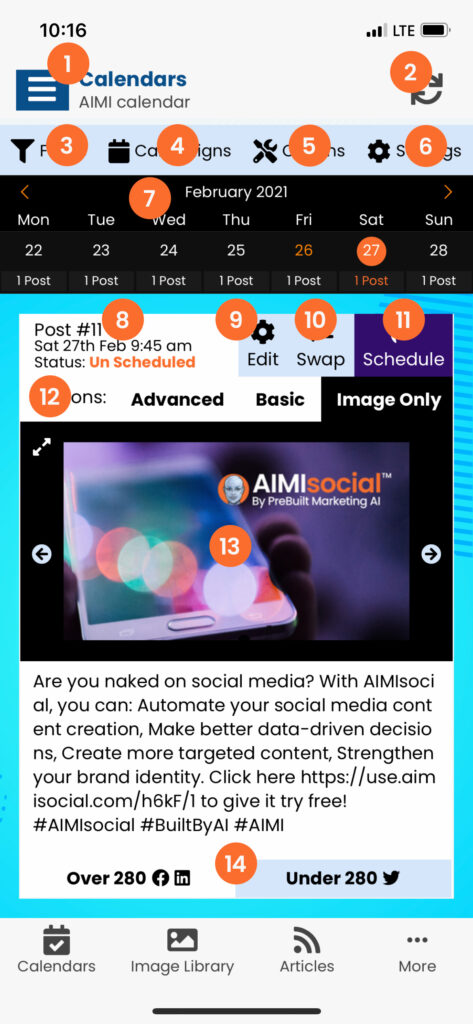
#1: Calendar List Menu
This menu is where you see the full list of all calendars you have created. It is also where you add and remove calendars from your account. Find training here: How To Add & Remove Calendars
#2: Calendar Refresh Button
When you click this button, we refresh your calendar data to show you the latest information on your posts. Find training here: How To Refresh Your Calendar Posts
#3: Calendar Filters
When clicked, this launches our filter options to sort your calendar by post status and day of the month. Find training here: How Calendar Filters Work
#4: Campaign Section
When clicked, this launches the campaign management section of the app.
#5: Calendar Options
When clicked, this opens a menu that allows you to create a custom post, create campaigns, schedule all posts, and unschedule all posts.
#6: Calendar Settings
This section has all of your calendar and “post to” settings to specify which social networks you want the posts published to when scheduled. Find training here: Calendar Settings & Defaults
#7: Calendar
The app shows you a week of posts at a time. When you login into the app, it will always start you on today’s date. You can use the arrows to skip forward or back a week. Click on a day to see the posts schedule for that day.
#8: Post Information
In this area, you will see the post’s name, the date and time the post is scheduled for, and the current status. Find training here: Post History, Status, & Posting Errors Overview
#9: Edit Post
Click on this button if you want to make any edits to your post. Find training here: How to Edit A Post (Post Editor Overview)
#10: Swap Post
Click on this button if you want to swap out this post for another from AIMI’s post library. Find training here: How The Post Swap Feature Works
#11: Schedule Post
Click on this button to schedule or unschedule your post to be auto-published to your social networks. Find training here: How to Scheduled & Un Schedule posts
#12: Image Post Options
Click on either “Advanced” or “Basic” to see the designs AIMI created for you. Or you can select the “Image Only” to post with just an image and no design. Find training here: Image Options Overview
#13: Post Card
Use your finger or click on the arrow icons to swipe left or right to see your next or previous posts. Click on the image to enlarge it.
#14: Text Area
This is where you review the text AIMI wrote for you for that post. Click on the “under 280” tab to see the version of the text used for Twitter.